Lite Version: Quick Start Guide
If you obtained Viva from an inworld store, you'll need to unpack it. The unpacking process involves organizing the contents in several subfolders. This will guide you through the process: Unpacking Viva If you purchased Viva from the Marketplace, it has been pre-organized in folders, and you can go directly to the Quick Start Guide below . . . In order to get rolling quickly, I've included a default skin and shape in Viva folder. The shape has been created specially for Viva, and the skin matches the skin which has been pre-applied to the mesh body. You can change, of course, to different skins and shapes. (Ten free skins come with the package and there is a series of seven Viva starter shapes.) But starting this way will help coordinate all the various body parts and features. After this quick introduction, you can branch out and tweak things to your needs. Look for the "Default Skin Wearable" in the Viva Main Folder (VIVA>> Mesh Avatar - MAIN FOLDER). Right click and select "Wear." This will coordinate the skin of your system head with the pre-applied skin on the mesh body.
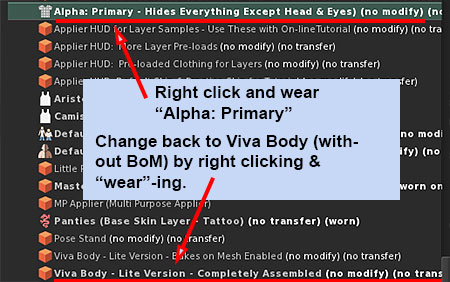
Find "Alpha: Primary" in Viva's Main Folder. Right click and "Wear." Your body will disappear and for the moment, at least, your head will be floating in space.
Look for "Default Body Shape" in the Main Folder. Right click and "Wear."
Right click and Wear "Default Physics" in the Main Folder. (I won't take time to discuss physics now, but if interested, you'll find a discussion about it here: Viva's Physics Effects.)
. . Find "Viva Body - Lite Version - Completely Assembled" in the Main Folder. Right click and "Wear."
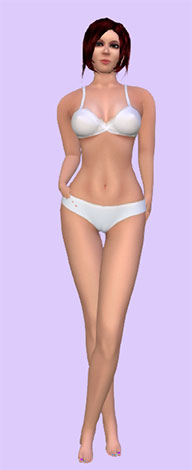
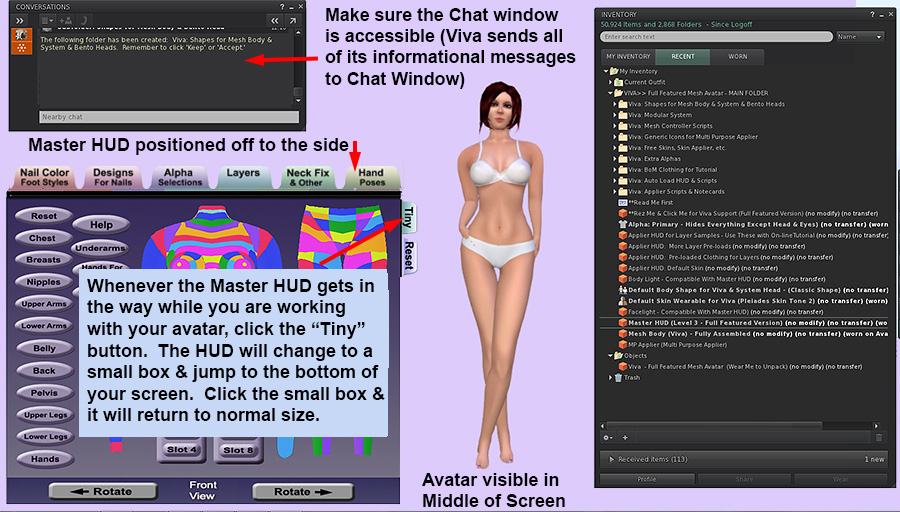
. It's up to you, but at this point, it might be helpful to have your avatar on a pose stand. You'll find a pose stand in Viva's Main Folder. Right click & select "Stand." Now, take a look at your avatar (shown to the right). The Lite version has one layer of clothing (besides the base/skin layer). It's called the Tattoo Layer. The Tattoo Layer is not restricted to tattoos. You can use it for other forms of under clothing as you can see here. The bra and panties your avatar is wearing has been applied to the Tattoo Layer. You can manipulate clothing in the Tattoo Layer in a number of ways such as coloring it, adding shininess, etc. but first we need to get the Master HUD attached. Master HUD In the Main Folder, you'll find Master HUD. Right click, and this time select "Attach HUD to . . . " and select an area of your screen where you would like to attach. I attach it on the left side of the screen just below the chat window (shown below). Since the Master HUD sends all of it messages to the chat window, it's nice to have the two together. This works for me, but you may come up with your own system.
The Master HUD is used for a variety of purposes. Because of its many different features, it takes up close the half of one side of the Second Life browser. This was necessary to fit in all of the features, but its extra size has the advantage of making the built-in help system easier to read. Every dialog screen on the Master HUD has a button which accesses a help page built into the HUD. The Master HUD is not intended to be worn all of the time. Use it to make adjustments you need and then detach it. You can always re-attach it when you need it again. When you need more room, click the "Tiny" button. The HUD will be reduced to a small square lower on your screen. Click the small square to restore it to its regular size. A Quick Look at the Master HUD
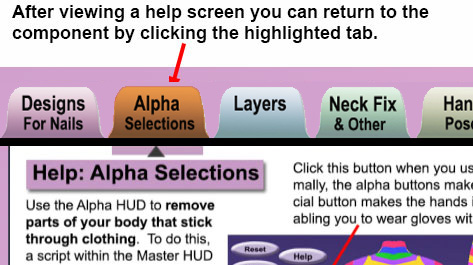
The help buttons are found on all components making up the Master HUD. They take you to a one-page summary of the component's features. To return to the component, click on its tab. The Master HUD gives you an incredible amount of control over the mesh body. But let's keep things simple and take a quick look at the Layer component. . Layers To access it, click the "Layer" tab. If you've been following along and haven't changed anything, you'll see the following. The blue highlights on the attach icon
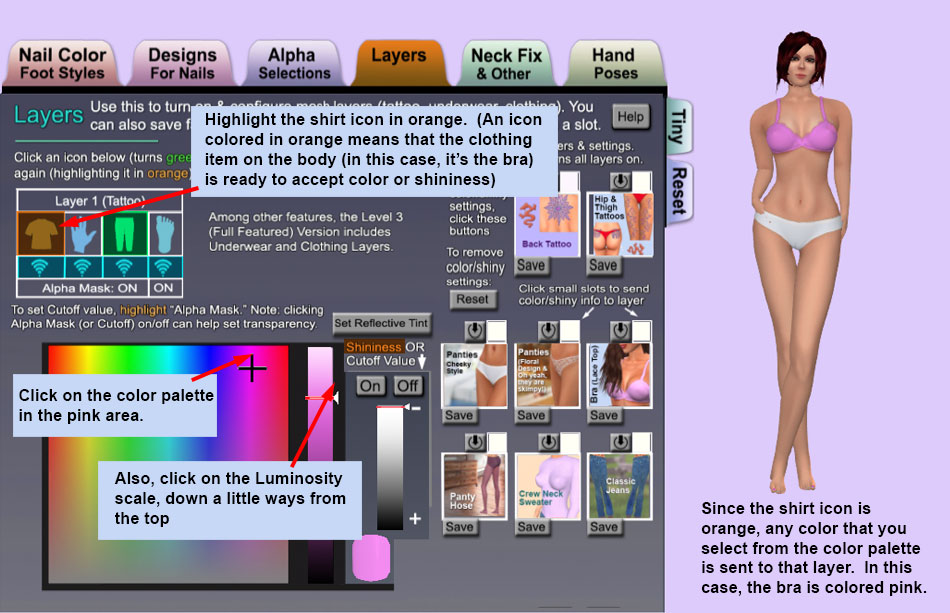
You can turn layers off and on. Try that with the bra. Click the shirt icon once. That will turn it orange. Click it one more time and the color is gone. It is now off. Try clicking on the Socks icon. Your avatar will be wearing blue socks. Let's do something fun. If you are wearing items which are white-ish or light in color, you can add color. This is called the "overlap color" since it overlaps the color of the item you are wearing. Turn on the bra by clicking the shirt icon so it is green. Then click the shirt icon one more time so it is orange. When a layer is orange, you can control it from the Master HUD. Click on a pink-ish color on the color palette and also on the luminosity scale as shown below. You'll see the bra turn pink.
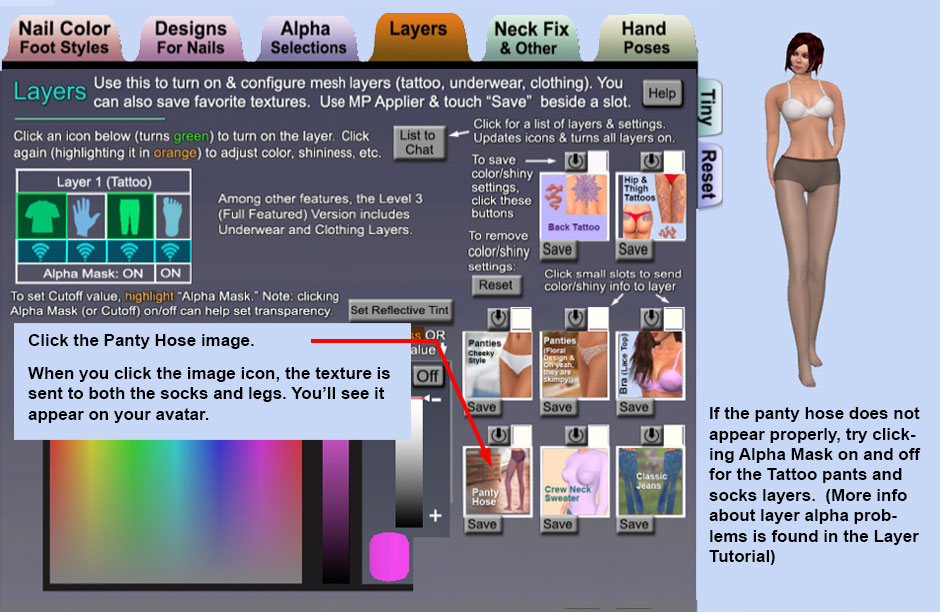
If you ever send the wrong color to a layer, or you just want to go back to the original color, click on the "Reset" button. That removes any overlapping color. Try that now. The bra turns back to white. The Layers component allows you to save some of your often used textures. They are saved to the boxes with the small images. You'll see that all of the pre-loaded textures have been saved in these boxes. (For information on how textures are received and saved to the Layers component, see the Layer documentation). Let's send one of the textures to your body. Click on the panty hose image. Watch your avatar. The blue socks will disappear because the panty hose covers the foot area. And you'll see the hose on the rest of the lower part of your body.
. It is possible that the panty hose might not look right. The panty hose has partial transparencies and that can cause display problems. Try clicking Alpha Mask on and off for both the Tattoo layer's socks and pants. If you still have a problem, it is because of something called "Alpha Glitching." Alpha glitching (and how to fix it) is explained in more detail in Layers Documentation & Tutorial. But . . . hopefully everything worked, and you didn't have to deal with the alpha glitching problem. At some point, however, when you are using layers with transparencies you will run into it. Dealing with alpha glitching can get tricky and it is something of a drawback of the layers system. The Layers system is very useful, but there is a new tool in Second Life that helps reduce lag and has many advantages. It's called Bakes on Mesh. I'll talk about that shortly, but before getting to Bakes on Mesh, let's attach a mesh dress.
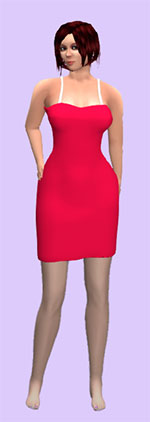
Attaching a Mesh Dress (Little Red Dress) Layers (and Bakes on Mesh) are most commonly used with tattoos and underclothing such as bra, panties, nylon hose, etc. On the other hand, clothing such as mesh skirts and dresses are attached and are worn over the top of layers. Let's try that with the Little Red Dress. The dress is designed to fit over the Tattoo layer.
A quick note about "Wear." I've pre-attached all of the items that you find in the Viva folder to different attachment points (here's a list). That way, you can just select "Wear" and you're ready to go. When you are attaching items that aren't from Viva's folders, you'll want to select "Attach" and select an attachment point. A clothing item that hasn't been pre-attached, will always attach to the Right Hand when "Wear is selected. If you select "Wear" for the next non pre-attached item, it too will attach to the Right Hand and remove the previous one. You'll see the dress appear on your avatar. The bra straps showing tells you that the dress fits over the Tattoo layer. We don't need the dress on for the next segment. Right click on it in your inventory and select "Detach from Yourself."
Bakes on Mesh The Lite version of the Viva includes a mesh version that is Bakes on Mesh (BoM) enabled. Let's try that out. In the Main Folder look for: Viva Body - Lite Version - Bakes on Mesh Enabled. Right click and wear. (If you are on the pose stand, upon wearing the body, your head will twist around (Exorcist style). It's a pose stand quirk. To get your head sorted out, jump off the Pose Stand and then get back on. Whew. . . that feels better!)
Now that we have the preliminaries out of the way, let's get some clothing on. In your Viva Main folder, you'll find Panties and Aristocrat Bra. Right click and wear the bra and the panties as described below:
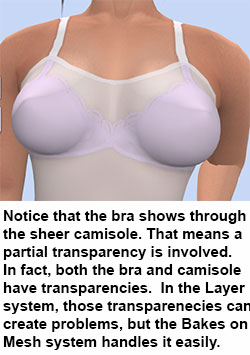
We are adding the the Camisole. If we were to select "Wear," the bra would have disappeared and camisole replaced it, but we want both. When you "Add" the item goes on top of the first one, the "Wear" item. So the camisole goes on top of the bra. If you mix things up, you can always, re-wear & re-add the items in the order that you need. The illustration on the right shows what you end up with. There are transparencies involved with both clothing items. As mentioned previously, that can cause problems with the layer system, but Bakes on Mesh takes care of it handily. Socks. Next look for "Cozy Socks" in the Viva's Main Folder. Right click and select "Wear." You'll notice two things about socks and the Bakes on Mesh body. The socks' texture will form around each toe and will look like fingersocks or glove socks. The Level 3 version has a way of configuring the feet so that socks cover the toes in a natural way, but that's not possible with Level 2. You'll want to take that in consideration when planning your wardrobe around the Bakes on Mesh body. You'll also notice that the toenails will end up on the outside of the socks. That's easily handled by turning the toenails off in the "Nail Color & Foot Styles" component. You can leave them on for now. We'll come back to them in a minute. One last note. The Master HUD works with both bodies: Bakes on Mesh body and the traditional Mesh body. (The Layer component, however, is not usable when used with the BoM Body since no layers are present on the body. Rather, layering is handled by Second Life's Bakes on Mesh system.)
Neck Fix The Neck Fix helps blend the joint between the head and neck. This is typically not a problem with the Bakes on Mesh body (another advantage to it), but you may need to use it when you use the Viva mesh body with the system head.
To see how it works, we need to wear the original body. Look in the Main Folder and find "Viva Body - Lite Version - Completely Assembled." Right click and "Wear." (Both this body and the BoM Body have been pre-attached to the same attachment point, so the BoM body will be replaced by the original body.) If you are on the pose stand, your head will do another one of those Exorcist twists. Jump off and jump back on. At this point, you'll notice that the body looks a little strange. That's because we are seeing both mesh body and the underlying avatar. That's fixed by wearing the Primary Alpha: Right click and Wear.
Watch and you should see the head and neck blend nicely. I have pre-set the color of the neck fix to work with the default. If you are using your own skin, you would need to select colors from the color palette to match the skin color. When matching colors, it is helpful to have the Tattoo Layer turned off. If you use one of the ten included skins, I have prepared neck fixes for each one with the proper color. They can be used with the modular system and you'll find those in the "Free Skins" subfolder. . Nails - Coloring I think one of the fun parts of the Master HUD is the fingernail and toenail area. Before going there, click on the "Layers" tab and turn off the socks layer. If you've been following along, you'll be wearing nylon hose. By turning off the sock layer, you will be removing the foot area of the hose which will give you an uninhibited view of your toenails. But there's another reason why I have you turn it off - and that's because of something called alpha glitching. Alpha glitching can cause your toenails to disappear if you apply a design. There's a quick fix to that discussed here, but let's not worry about it for the time being. We'll just keep things simple by turning off the sock layer. Let's get back to having some fun. Click on the "Nails and Foot Styles" tab.
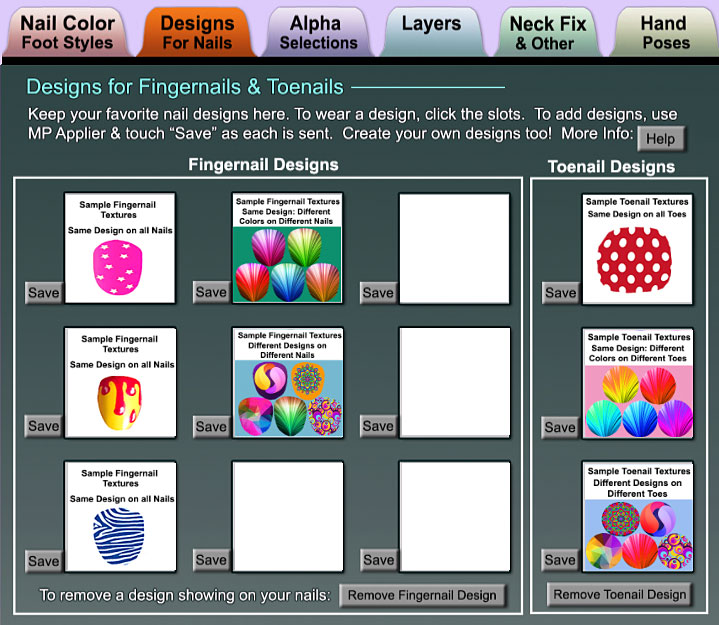
Much of the Nail component is self explanatory. You can turn the nails on or off. You can change the foot style as well as the style of fingernail. Fingernail and toenails are colored by clicking on the color palette - and you have your choice between natural or colored nails. Shininess, also, is easily added. You can really make your nails look beautiful. Remember to highlight either "Fingernails" or " Toenails" before coloring. Sometimes, you'll find yourself clicking colors and nothing seems to be happening. That's probably because you might have "Toenails" selected but you are looking at your fingernails. It's probably easiest for you to play around with it. For anything specific, see: Nail Component Help Documentation. . Nails - Designs If you really want to dress up your nails, try the Nail Designer. It is reached by clicking on the "Designs for Nails" tab.
Like its sister component, Fingernail and Toenail coloring, this part of the Master HUD is pretty much self explanatory. Specific help documentation is found here. This is one part of the Viva system where it is not very difficult to make your own textures. If you are thinking about making, nail designs are a good starting place. You'll find a UV texture for nails in the Creator's Kit. One helpful hint: if you select a design for your nails and then later color them, be sure to remove the design by using one of the "Remove" buttons on the Nail Design screen. If you don't remove the design, you'll end up getting a mishmash of colors on your nails.
Alpha Selections
Click on the colored areas of the body within the HUD, and you'll see them turn black. At the same time, you'll see that part of your mesh body disappear. If you want the body part to reappear, turn it back on by clicking the same area again. The black is removed and the body part becomes visible again.
You can save alpha arrangements by clicking one of the "Save Slots." That's handy when you get things just right for a clothing item and you want to be able to re-call that same arrangement of alphas at a later time. More information on the Alpha component is found here.
Hand Poses Hand poses are fairly self explanatory. Use that segment of the Master HUD when you want to try something new with your hands. For more information on the Hand Pose HUD and some background on the poses, see: Hand Pose HUD Help.
Modular System Since mesh avatars use lots of virtual world resources - and can cause lag, particularly when groups of avatars get together - it is important for mesh creators to provide ways to reduce that impact. One of the ways by which you can use Viva to help in this matter is to use the Modular system. In the modular system, you assemble the mesh avatar with just the parts that you need. You are never locked into any configuration. You can change it by adding or removing parts just like you do with clothing. That's all explained on this page: Modular System.
Saving Outfits One quick word about mesh avatars and outfits. Second Life has the ability to save an outfit. An outfit consists of everything that you are wearing including clothing, the mesh body, and any attachments. You save an outfit by right clicking on your avatar and selecting either "Appearance" or "Edit Outfit." The items which make up a saved outfit are not actual copies, but rather they are links to items scattered about in your inventory. Included in those links is a link to the Viva mesh body. But if the link went to the body in Viva's Main Folder, you would always end up with a different set of body characteristics. If you are saving an outfit, you should make a copy of it. The copy can be placed along with a clothing item or a can be placed in a shared folder that you might use for similar outfits. There is a detailed explanation how this works in the Modular System help page. . That's it. If you need additional details, check out any of the links below.
Links to Help Support | Viva Forum | Creator's Information | Comparison Chart of the 3 Levels
|


 I won't cover the Master HUD in detail here, but plenty of help is available both right within the Master HUD with links to on-line documentation like this one.
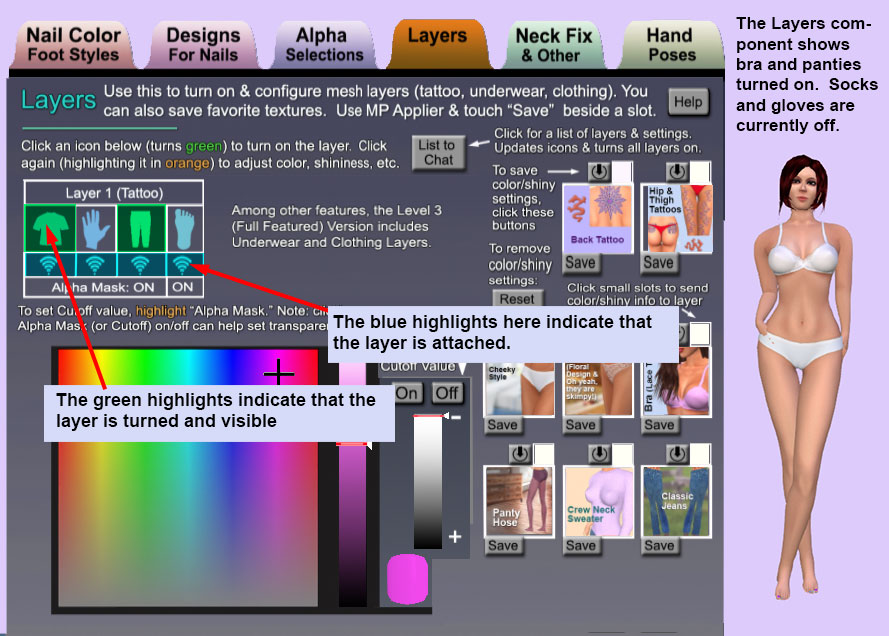
 You'll find the Little Red Dress in the Main Folder. Right click on it and select "Wear."
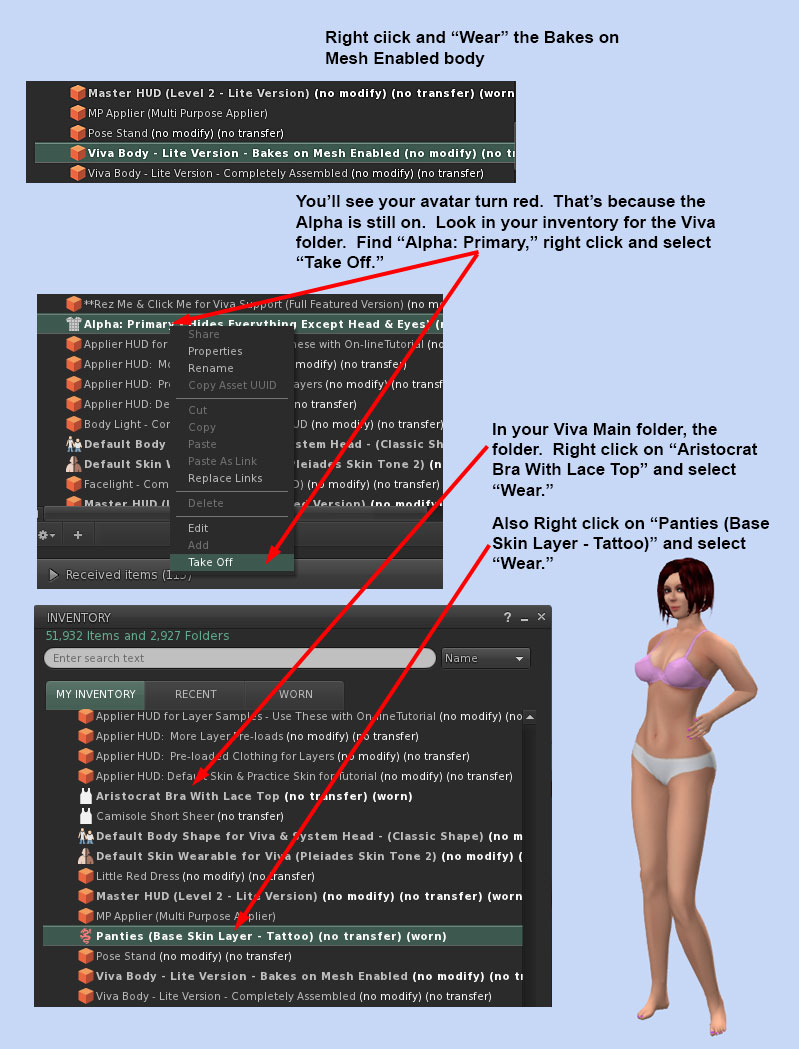
 Looking good so far. Let's add a clothing on top off an existing one. Right click on "Camisole" and this time select "Add."
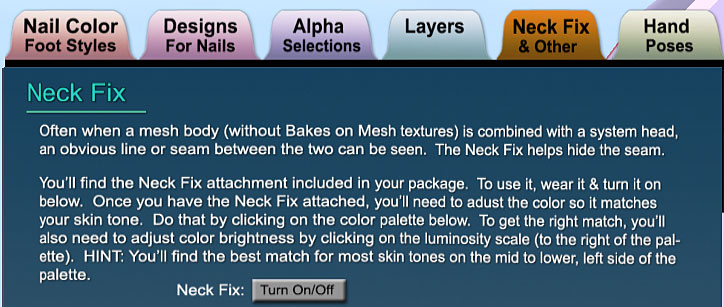
 Let's try it. Click on the "Neck Fix" Tab on the Master HUD. You'll see the above screen display.
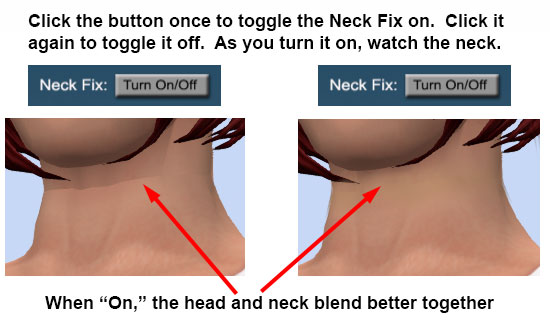 Now look closely at the neck. You'll probably see just a little difference between head and neck. Click the "Turn On/Off" button beside "Neck Fix."
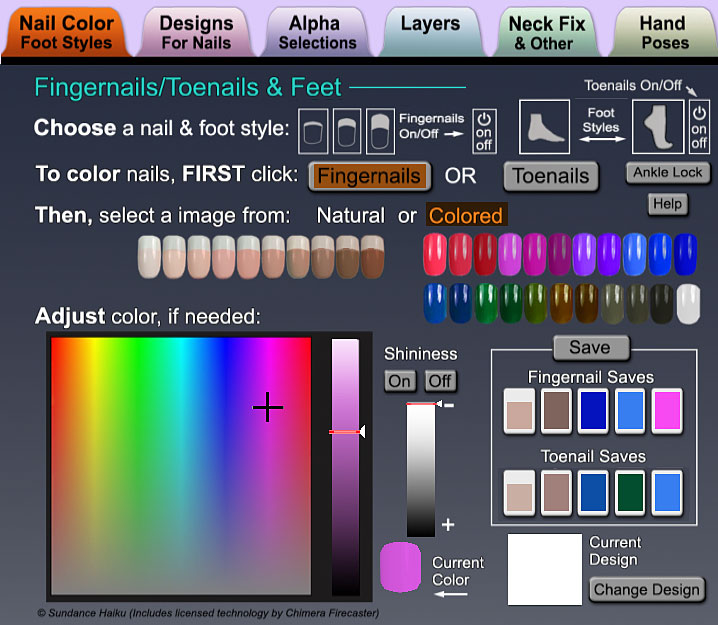
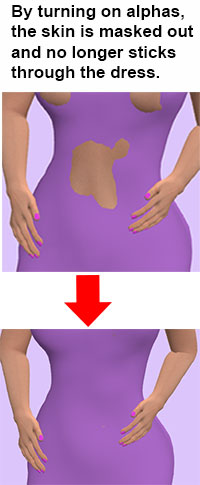 The Alpha Selection component on the Master HUD allows you to mask out parts of the body when you wear mesh clothing such as dresses. If you use the Bakes On Mesh body, the creator may have provided a wearable alpha, and that case, you wouldn't need to use the Alpha component. But if the alpha wearable is not available or you're not using Bakes on Mesh, then use Alpha component to remove parts of your body that stick through.